THE EXPERT'S GUIDE TO USING THE COLD SMOKE GENERATOR
Our patented ProQ Cold Smoke Generator (CSG) is a simple device designed to produce cool, clean, and consistent smoke. There are, however, several steps that can be taken to achieve a hassle-free burn time and time again.

Top Tips for Success
DUST MATTERS
Selecting the right wood dust for what you’re smoking is important, but even more important is the quality and condition of the dust you use. If you want a clean burn, make sure your dust is clean and dry and only source dust from a reputable smoking wood supplier (we recommend our dust as we know it works!).
Dust exposed to the elements or left in a damp shed will absorb moisture from the air, so store it in a dry place and preferably indoors. If your dust is going out, we suggest that you microwave the dust on high for 30 seconds (on a suitable tray), or spread it on a baking tray and place in the oven on a low temperature (around 90°C/194°F) for 30 minutes, allowing it to cool off. This will help dry the dust out and burn more evenly.
Tip: If your dust is still being troublesome, you can lay down a layer of beech or oak dust (about 20% of the height of the mesh) to help it along.
SMOKING CHAMBER
Choosing a suitable smoking chamber is pretty straightforward. The ProQ Cold Smoke Generator works in pretty much any BBQ with a lid and this is probably the most common choice. Some well-known brands that work with the CSG are Bradley, Weber and Brinkmann, but it’ll work in just about all existing BBQs provided they have a lid. Alternatively, they also work in many homemade cabinets from dedicated wooden cold smoking chambers to cardboard boxes, filing cabinets and more – we’ve even seen a repurposed bee hive!
The chamber doesn’t need to be airtight nor keep smoke in. The goal is for the old smoke to flow out and make room for the fresh smoke. All that's needed is a gentle airflow in the bottom and a chimney for the smoke to come out of at the top. If there is a chance of juices dripping onto the smoke generator, a tent made from heavy duty tin foil can be placed between it and the food.
PREPARATION
Inspect your Cold Smoke Generator before use, checking for any holes or gaps between the mesh walls that could cause the ember to jump the run. Ensure your CSG is bone dry; once it has been cleaned and rinsed it will need to be left to air dry thoroughly.
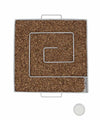
After filling the CSG with dust, hold the 2 side handles and gently tap the CSG on a flat surface using an up and down motion, then gently tamp the dust down using your finger so it's compact but not too tightly packed.
Finally, starting from the middle run your finger along the top of the maze like you would with a souffle, leaving the top of the maze clear and visible. This will stop the ember from jumping over.
LIGHTING
Position your tealight carefully under the sloped part of the run, ensuring the flame doesn’t touch the run next to it. When the lit tealight is in position, make sure there is sufficient dust directly above the flame, if not you can add a little more. If using a Kitchen/Culinary Torch, position the flame in a downward vertical position, directly onto the wood dust in the corner of the generator at the sloped mesh, again being careful not to light the next run of dust.
Once the wood starts smouldering, remove the tea light candle. Keep the CSG outside the smoking chamber away from drafts for around 5-10 minutes to ensure it's burning well. You can also gently blow on the ember to get it going nicely. Carefully place the lit CSG inside your smoking chamber and leave it for 30 minutes before checking to make sure it’s still smouldering and crucially hasn’t jumped runs.
SMOKING
It is good practice to check on the burn every so often, especially during longer smokes. Once smoking is complete, remember the CSG may still be hot so use BBQ or oven mitts to remove it from the smoking chamber. Keep an eye on the ambient temperature and aim to cold smoke at temperatures below 21°C/71°F. The ambient temperature has a huge effect on the speed of bacterial growth which can cause food poisoning or spoiling. Try to do this overnight or during cooler times of day.
CLEANING
After each use, empty the residual ash into a suitable non-flammable container or bin. You may notice that after several uses a build up of ash and tar will form. At this stage, we recommend soaking the CSG in hot, soapy water, brushing off the debris with an old toothbrush and rinsing it with clean water. Be sure to let the CSG dry thoroughly before using it again.


