

Pro-Q Smokers & BBQs
Pro-Q Smokers & BBQs
The Ultimate Guide to Steak Success
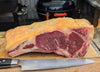
Start with good beef
Probably the most important point here, and maybe an obvious one, but good beef is really the key to good steak. Now, we’re not saying you have to get A5 Wagyu to have a good steak, far from it, but try and source good quality beef from your local butcher or a reputable online butcher. Buy the best quality beef that you can afford. Try and find something with some good fat marbling through the muscle, this fat is flavour and will render & melt throughout the meat as it cooks.
Bigger is better (mostly)!
Buy thicker steaks, rather than more steaks. Ribeye, tomahawk, sirloin, bavette and rump are made for the BBQ. The cuts that lend themselves best to longer cook times and cooking over fire. They tend to have more marbling and fat = flavour.
We’d recommend at least 1” thick, preferably 1 ½ - 3”, and if you fancy it, try something on the bone for a bit of extra flavour. As a bonus this also adds a bit of theatre to your presentation, carving up a nice hunk of meat usually gets stomachs rumbling!
Thinner steaks are harder to measure the internal temperature on and cook much faster, making it easier to overrun on your desired cook temperature. If you’re cooking thinner or leaner cuts such as fillet, chateaubriand, feather blade, onglet/hanger, we’d recommend cooking them as whole cuts and searing them hard until you hit your internal temperature for doneness.
Fire & choosing fuel
We’re huge advocates of cooking over fire (can you tell?) and a good, clean fire is essential to cooking good barbecue.
Get a level bed of lit coals going for your sear, making sure the temperature across the grill is roughly even and really hot. If you hold your hand 6” over the grill you should only be able to keep it there for about 3 seconds.
This means when you turn/move your steak you won’t end up with one side less cooked than the other. If you’re smoking before/after the sear, make sure your fire is burning nice and clean before you put your meat on.
Your fuel choice is important, and accelerants are out. Use some restaurant grade (read: bigger chunks) lumpwood charcoal, or some high-quality briquettes and avoid anything that mentions “instant lighting”, or cheap paraffin fire lighters.
Try different methods
There are so may ways to skin a cat (or cook a steak), it’s worth experimenting. Despite what you might hear, there simply isn't an objectively “best” method for steak cooking, and a lot of this comes down to your preference & the cut you're cooking.
The classic sear, or what I call a “French Sear”, is essentially the same method used in classic European cooking. Sear hard first, and then put the steak in the smoker until it comes up to your desired temperature before you rest & serve. This is a tried and tested method and produces fantastic results, although we think the steak takes on better smoke flavour with the reverse sear.
Reverse searing has long been a favourite technique of ours. Basically, you cook the steak at a low temperature (around 110C) in the smoker to just below your desired doneness before resting and then searing hard for that beautiful crust on the outside. You can see our full method for this here, the recipe is for Ribeye but will work for other cuts.
Both of these methods work very well for the thicker, fattier cuts of beef, and will ensure your fat renders nicely, plus it gives you the opportunity to add some smoke to the mix.
What about cooking thinner or leaner steaks? There are loads of options for different searing methods. We’d always recommend cooking these directly over the fire and if you have good lumpwood, even directly in the coals. Another thing to try is searing on a plancha plate, hot cast iron grill with a touch of butter for the perfect Maillard reaction (or crust), another fantastic (and very portable option) is our Afterburner Steak Grill.
Searing Technique
In our opinion, turning every minute or so is the best way to go. It’s long enough to get a good browning and gives the steak a chance to cook through. Turning once in the middle of a cook does work but requires a lot of experience and estimation of how done the steak is and knowing when the middle of your cook is. Constant moving is also good but personally we like the grill marks you get from the other methods.
When turning your steak, try to move it to a fresh part of the grill so you’re getting the most of the heat from the grill itself, this helps with the grill marks and increases the browning.
Seasoning before, after or during the cook?
Good steak tastes of good beef and seasoning should enhance that flavour, not cover or overpower it. It may be controversial, but we like to season with salt and pepper before we cook. Plenty of people say this will burn the pepper (probably) and can taste bitter, but that’s not our experience. Either way, it’s almost universally accepted that steak needs salt.
We’ve found that seasoning too early can start to cure the outside of the beef and seasoning late doesn’t have as much of an impact, so we’d rather season closer to cooking. We recommend taking the steak out of the packaging and putting it on a rack in the fridge 3-4 hours before you cook, seasoning around an hour before it goes on the fire.
With thinner cuts, we keep them in the fridge until about 10 minutes before they go on and with thicker cuts we don’t refrigerate after we season so they have some time to temper. If you like rarer steak, you can keep the steak in the fridge longer - this will keep the centre of the steak pinker.
Ditch the olive oil on the steak, it burns fast and creates acrid, black smoke. Salt will draw out moisture on it's own and stick any seasoning on by itself.
When is it done?
The absolute key to this is who you are cooking for and what they like. So how do you get steak perfectly “done”? Internal temperature is the answer. This one, simple thing can guarantee you get the perfectly cooked steak for whoever is asking for it and despite the jokes, you can even have a tender, juicy well-done steak. Check out our chart for steak doneness temperatures.
Doneness or cooked internal temperatures are what you want to aim for when the steak is ready to serve, bear in mind that your meat will keep cooking whilst it’s resting, which can be the difference between Rare and Medium. The internal temperature can rise as much as 10°C after the steak comes off a hot grill.
We usually aim for 8°C below the ready temp and then rest for 10 minutes (or however long it takes to do something else before we serve). If you’ve overshot your temperature a bit, you can slow down the resting rise by cutting the steak in half, this allows some more heat to escape from inside the steak and help to stop it cooking.
Preference is preference, but different cuts do lend themselves to different “doneness”. Cuts with pieces of harder fat like ribeye or sirloin will benefit from being cooked to a higher temperature because of that hard fat or “eye”. In the case of the ribeye, you want that to render and be deliciously edible when the resting is done so aim for just under medium.
Leaner or thinner cuts can be cooked to whatever doneness you like, they just need a good crust on the outside, although we’ll always prefer rare and always avoid resting these for more than 5 minutes as they can go over very quickly.
Service Please!
The last step is slicing, and this can have a huge impact on the texture and chewiness of your steak. If you look at the structure of the muscle and the fibres that run through it, you can imagine chewing longer fibres would be more difficult. If you cut across the fibres or “grain” as it’s often called, you can make sure those fibres are nice and short and the steak is more tender and easier to chew.
If a steak has multiple muscles, for example a ribeye with it’s oval centre and the muscle that runs all the way around that, you can separate those two muscles and slice them separately for the best results.
Conclusion.
So, there you have it. Buy good beef in thicker cuts, use good charcoal & wood, test your techniques, try a reverse sear, season before you cook, watch your internal temperature & slice across the grain.
If you think of anything that’s missing from this article, feel free to reach out to us on socials (links at the bottom of the page or by email, we’re always happy to talk about steak!